Sunday, July 29, 2012

The vase stands alone....


The vase stands alone


Sometimes the vase tells the whole story….


Sometimes the vase is prettier than the flowers.  It may not be a vase at all, but an imaginative piece begging to be a vase.  Here is a piece of cherry wood crafted in the North Carolina Highlands containing dried nigella pods (love-in-a-mist) and oregano flowers.


This charming fish plate, sauceboat and ladle tell a great story.  The ruby cockscomb in the sauceboat lends a velvety texture to the glossy china.  These ceramics are from Portugal, though the motif looks very Asian, like a big fat carp.


A stunning piece, the porcelain basket exudes a rough texture and very Armani-like color scheme of tans, taupe and gray.  The orderly, pristine white ranunculus play off the craggy openings in the basket which create a great rhythm from the hands of a master potter.


This cylinder has an almost Prussian blue specked glaze over a mustard brown. Above a dense band of blue in the middle, a fascinating ring of texture winds up to the opening.  This ceramic doesn’t attract attention until it is graced by the lyrical clematis branch.  


My favorite of Mimi’s favorites, this Spode cache-pot shimmers with vibrantly colored transferware  flowers in rich deep colors.  The picotee  carnations are custard colored with a burgundy edge picking up the tones of the container.  Though the carnations may be a little busy for the ceramic, I was drawn to their old fashioned quality  with the bold, almost Victorian design. 


Look around your house and let the vase do the work for a change.

Cheers!


Thursday, July 26, 2012

Let us entertain you


 Colors chipped


For Mother’s Day I received a wonderful present from The Bride (see June post, “Beginning with a Wedding”).  Paint chip placemats!  There isn’t a paint color sample card that I don’t love, and my drawers are full of them.  Now I am able to set the table with them.


These colorful placemats are from Avril Loreti at Modern Home in Canada via www.etsy.com (once on the site enter ‘paint chip placemats’ in the search box) and make a colorful splash on the dining table.  The bands of color have names in English and French: " you’re so cool/tu es genial", "sunshine soak/embrasser le soliel", "gum ball/rose bonbon".  Always more lovely in French, n’est pas?


The cotton sateen napkins are from Crate & Barrel. Because I waited for these to come on sale ($1.95 vs $4.95), I did not have as many colors from which to choose.  I console myself that as a group the three napkin colors (lavender, marine blue and lagoon) can be used with other mats.


 Only green was used for the flowers in a simple low design.  Left over  from the last post: "Two dish design", variegated aspidistra (also called ti leaf) was rolled into a tube shape, a small oasis blob (technical term) inserted at one end, the mum or hydrangea at the other. The leaf can be held by stapling it, using a glue dot, or using a pin from one leaf into the other.  A few leaves were left without a flower or oasis, and the whole thing set on the same leaves.   Once in place, and not falling over, lily turf grasses linked them.


These rippled water glasses in various colors have long been waiting for such a vibrant setting (from a terrific shop in Wilmington DE called The Blue Streak)!


Crate & Barrel has colored votives in sets of 4 cool colors or 4 hot colors and sold in sets of 18 in long plastic tubes.


The fruit tarts had a scheme all their own, and since I didn’t make them, they were delicious!
Cheers!

Monday, July 23, 2012

Two-dish design


Dishing it out….


Last Friday at the Berkshire Botanical Garden (www.berkshirebotanical.org), I taught a class called “Cutting Edge Design: Not your mother’s flower arrangements”.  We began with a brief power point on the exciting new arrangements that take on the aspect of organic sculptures.  Then we got down to the business of making a two-dish design.


The students used these wonderful glass plates with cobalt blue swirls (www.target.com  & only online) in two sizes, dinner and salad.  These very reasonable plates come from Murano, the glass making island near Venice.  


Using two pieces of Oasis, we set them up with an oasis between the dinner and the salad, and one on top of the salad.  A quarter slice of oasis went between each plate, the edge covered by part of an aspidistra leaf.  These are variegated leaves with random white striping.


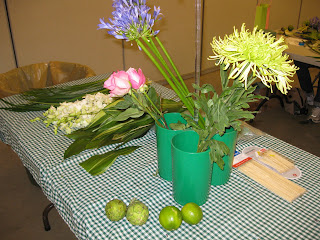
The other materials were:  white mini calla lilies, sky blue agapanthus, bright pink roses, lime green spider mums, variegated aspidistra, lily grass, galax leaves, bear grass, baby artichokes and small limes. 


The students did a great job!   Once they had assembled their plates - rather like making a floral an ice cream sandwich - they then chose where they wanted to put the fruits. Limes and artichokes were left whole in some places and sliced in half in others.   


Despite the fact that they all used the same materials, each design had an individual flair. Rhythm is created by the linking of the two levels of the design.  Assorted glass headed corsage pins  (www. jamaligarden.com) help to hold some of the plant material in place.


Using the bear and lily grasses, the levels can be linked and the design gains some exuberance from these large spaces which are created. 


Any shape plate can be used as I did here with square plates, putting one on the diagonal to the other.  Glass plates with an interesting edge (see demonstration of oasis above, plates from Crate & Barrel)  sets up a cool summery water-like aspect to the design.  The artichokes which have the look of water lily buds carry that idea through. 


Always use two skewers parallel to each other to hold the fruit into the oasis.  Oil of clove (health food, drug stores) on the skewer will create a seal and eliminate the opening as a source of fruit flies – but cannot promise the same for the surface of a cut lime.


The design above was done several years ago in East Hampton.  These plates are much larger and you can see I have used much more material including some white and green tulips and moss.  No rules to this idea, its fun and sturdy!  To keep the oasis moist put some ice cubes between the flowers and let them melt down.

Cheers!

Thursday, July 19, 2012

Anatomy of a design


Pediment/Pentimento

 the flower show:  Loyalist Legacy

Class 1 Pediment/Pentimento                          4 Entries 

A design staged on a fluted pedestal 42” high with a 14” square top. Design not to exceed 14” from center of pedestal top on either side. Viewed from all sides.


An often asked question is, "where do your ideas come from?"  In this case, I began with the dictionary.  The alliterative class title contrasted two kinds of forms: pediment, the geometric triangle of classical buildings and pentimento, which, in one meaning, means delicate interlacing of lines.  This contrast of form of the solid and airy would be the basis of my design.

Materials: 
a sheet of oasis glued to Styrofoam (bought this years ago at a workshop and despaired of ever using it - haven't seen it for sale elsewhere, but also haven't looked) 

1/2" wooden dowel

oval wooden 'plaque' (Michael's)


Styrofoam/oasis is 3.5" thick.
Cut dowel, screwed into the base.  


Wanting to avoid a predictable, horizontal triangle, I shaped it vertically,  deconstructing it from a pediment to a vertical triangle.  The dowel is jammed into point of the triangle so it stands upright.  

I found the resulting top, which was straight across rather less than dynamic, so I added another smaller triangle (top, right) – this creates more interest, and takes the concept further from a literal idea.  The long edge of this topmost piece becomes the hydrated oasis.  

 The rather odd cut, barely seen in the top oasis, separates the part that is actually hydrated from the rest of the oasis on the form, and becomes the water source for plant material. 


The plant material chosen would be lacey and open, suggesting a kind of tracery.


Plant materials are:

Aspidistra - long leaves used to cover triangle
Jasmine - lacy pink & white vines
Clematis - both large white & smaller pink 
Nigella pods - love-in-a-mist pods color of clematis centers


The day before the show I bought my plant materials and conditioned them thoroughly, or thought I did.  I took a first time chance on using the clematis as the show was only up for one day. In the end, they didn't fare very well....


Five bunches of Aspidistra leaves are used to upholster the form.  This was the only part I practiced – several times – trying for as ‘clean’ a form as I could get.
  
This was my first attempt (right). I used the side 'seam' of the structure to line up the pinned leaves (see below also) and let them overlap each other on the front surface.  The hardware store yields a plethora of interesting pins/nails to be used in modern designs.  The secret is that their use needs to make sense from a design point of view and to use them precisely, otherwise they become a distraction. However....


As preciseness is not quite in my skill set, I decided on another method which would hide any pins I needed to do the job.  Because the aspidistra leaves have a stiff spine, I separated the leaves  (right of picture) down the spine.  They have a fat half and a narrower half (left).  Discard the spine.


Starting at the top of the triangle overlap a leaf from left and from right to cover the shape (left, above).  Once you are about a third of the way – descending –  one leaf half will fit from side to side.  I didn’t worry about the sides of the structure and their pins looking neat but just  kept the tacks close to the middle.   Once both the front surfaces were all covered, for the sides of the structure, put double stick carpet tape (Scotch brand)  on the back of whole leaves (removing the spine where it starts to thicken), and overlapping the leaves vertically as in the drawing (right).  The leaves on the front of the structure are placed starting at the top and going down overlapping each as you go.  The sides of the structure are placed in reverse, beginning  at the bottom and layering up.  All of the leaves will last without water easily for several days.   It is harder to describe or draw than to do!

I did make rather a production of the base so that I wouldn't have to use a lot of gravel (Accent Decor) to fill it up.  One can always take a LOT of gravel and just fill it up instead of doing it this way!
Base:   12” square tin tray, sprayed black  then a 12" x 12" styrofoam.  Place the base on the styrofoam.   Fill in with torn newspaper strips to raise the level and top it off with 12” X 12” piece of black paper. Finally the gravel...   

At the show, the best laid plans…….
The two triangles did not fit together as well as they should and once the upper one was hydrated the whole design was quite top heavy.  If it didn’t sit straight, the rest of the design wouldn't matter at all.  Wooden skewers held the two triangles together.  Using more padded newspaper to level between the top triangle and the larger one, more aspidistra leaves were then slipped in to cover the gap (whew!).


Would that I had had a step stool when adding the tracery - it was was up high and hard to see the Oasis gap between the leaves in which to put the fragile stems.  On reflection, it was almost like a crack In the pediment that sprouted vegetation.

 “triangle/tracery”


Although I usually resist using a title/intent for my designs,  I used this simple one as my intent.


The camaraderie of designers is infectious in these shows.  We all mumble and stumble and help each other.  Don't you think my fellow exhibitors in the class used luscious plant materials in gorgeous colors  in their designs?


It was hard to photograph these without the distracting backgrounds of the lovely club.  You can see that it was one part of a very lovely flower show.  Congratulations to the Garden Club of Lawrence and the hard-working flower show committee!

Cheers!


Sunday, July 15, 2012

Vegetarianism


Summer's bounty


It is ‘high summer’ and  our gardens and farmer’s markets are bursting with fresh vegetables.  These can inspire us to use them in different colorful ways for our own enjoyment or for summer entertaining.  With houseguest season in full swing, one of these ideas might brighten up your kitchen, porch or wherever your guests congregate.


How’s this for some melon excitement?  This gorgeous artistry had pride of place on the welcome table at the Dixon Museum of Art, Memphis TN, in April.  Kudos to the talented person who sculpted this!  I’d say do try this at home, but how do you start?


The cut glass container above is a celery jar.  In the Victorian age, celery was a delicacy and was served standing at attention in these jars which are generally straight and wide to hold the stalks.  I have collected some for my favorite ‘marching down the table’ theme.  My idea was to use the celery with its stalks and leaves as a component in the design – but definitely not for plucking out and eating!  The challenge is to find celery stalks with leaves intact, which is nearly impossible as only the inner stalks seem to escape the chop of the seller’s knife, and farmers are not growing it locally around here.


A take on the modern-mass (see The pastels of June) using both green peppers and Savoy cabbage as components, with beautifully variegated cordyline leaves and asparagus fern.  These peppers are large and are on skewers (always use pairs of skewers to be secure).  If you dip the skewer in clove oil (drugstores, health food shops) and then into the pepper, the pepper will seal itself around the skewer and you won’t get fruit flies breeding in the opening.


An old wooden starch box with patty-pan squash, assorted sweet peppers, brussel sprouts and Savoy cabbage, topped with the sinuous curves of garlic scapes – what wonderful rhythm they create, animating the box.


So maybe all your starch boxes are being used!  This grouping is in a metal container (Michael’s crafts).  I have eliminated the cabbage and squash and used a maidenhair fern plant (grocery store) still in its pot (easily watered).  Notice how much 'quieter' the design is without the yellow and purple.  All your vegetables will play well with others, so go and have fun with them.

Cheers!

Friday, July 13, 2012

Ashintully


Berkshire wanderings....


One part vanished stately home, one part romantic garden, all parts serene and very much off the beaten track, Ashintully, the Berkshire property administered by the Trustees of Reservations (www.thetrustees.org), provides a lush green landscape in which to spend an afternoon. 

  
Early in the 20th C, Robb dePeyster Tytus and his wife, Grace, built a 35 room mansion on a hill overlooking the Tyringham Valley. Mr. Tytus died just after the house was completed, and a year later Grace remarried and had a son, John Stewart McLennan, Jr.   


Mr. McLennan spent childhood summers here and inherited Ashintully when his mother died in 1937. Destroyed by a fire in 1952, only the foundations and four Doric columns stand today.  He and his wife, Katharine, lived below the hill in a farmhouse, with a separate music studio created in the barn.  An award winning composer and musician, he began creating gardens and sculpting the land.


When we visited last summer, Katharine was still living there and she charmed us with stories of her husband and the gardens. She described her husband’s methods for working with the land, shaping it to his vision and finding the perfect stone or plantings to carry out his vision.  Above a dry stream bed gently curves through the landscape, bisected by and handsome bridge.  Last summer’s visit was when it was hot and dry, I am sure this stream is not dry in the spring.


A lead ram’s head acts as a finial to the end of the bridge.  There are lots of such details to discover.


Looking beyond the bridge, the path wanders off towards the woodland.  If you peer closely, you can see two ‘found’ columns drawing the eye on. 

  
Eleanor of Acquitane holds court in this garden.  The lush boxwood hedge shows off the lovely statue, which is notable for its beautiful drapery.


If you follow the trail up the hillside, you will reach the site of the mansion (top photo).  In the encroaching landscape, remnants of the old driveway and entrance court fight with the weeds.


Ashintully is Gaelic for “on the brow of the hill”.  What hopes and dreams must have been centered on that hilltop landscape and what a romantic ruin it is today.  It must be spectacular in Autumn as the leaves turn and fall, opening up the view from the mansion even more.

Cheers! 


PS  I am teaching a workshop, "Cutting Edge Design: Not your mother's flower arrangement", at the Berkshire Botanical Garden (www.berkshirebotanical.org) on July 20th from 10AM to 1PM. Do register and come!  I will be blogging about it later this month!